Showing posts with label ONE STAMP - Poinsettia. Show all posts

Sunday, 22 September 2013

*35 And Finally..... another card from Suzee

I hope this card encourage you guys to belive in what you can do yourself. That you spread your wings be they crafty wings or not and encourages you to just take one step at a time to fulfil your own wishes. This is the last post we have planned for today. We have enjoyed it and we hope you have too. Stay in touch with the Oak House Studio team on the blog, on facebook and the website.


*34 Various Tags with the Poinsettia Stamp


During the day at the studio today we had a few visitors so we made a few tags, I love how everyone is so different. The thing I enjoy about stamping and my classes, is everyone can be inspired in a different way, lovely that everyone can express themselves.

*33 Wintery tag


I love the lovely purply iciness of this tag by Suzee. 

I also like the way she has stamped in the background.

*32 Stampers Christmas Notebook

This a 4inch square booklet made with a mountboard cover and bound with my Bind it All.
The square has been sprayed with Colour Chemistry inks in a Bottle, Spode Blue, Jubilee Blue and Citrus Lime. It has been over stamped with Walesby Background. The poinsettia was stamped and embossed with Gold detail powder and the cut out, colour was added with my swipe technique, so fast and so simple.
I use PVA to add the two layers to cover as this is nice and strong.

*31 Video tutorial on fastening the stamped images to some ribbon.


Here we go a short video tutorial on attaching a three later poinsettia to ribbon to make various decorations.

*30 Christmas Poinsettia

Elaine here with my last project for the One Stamp event and guess what, I've actually made my first Christmas card!


The Poinsettia has been randomly stamped and gold embossed on gold card and embossed three times on red card sprayed with Glorious Gold Ink in a Bottle - it gives the red such a wonderfully Christmas sheen!!  I've just cut the poinsettias into various layers and built up the flowers with foam pads.  It's finished with the Happy Christmas stamp also from Oak House Studio.

The 24hrs is nearly at an end but I think there are still more projects to go on here so make sure to come back later.  Projects are on facebook too so don't forget to look there too. 

And thanks for looking!! 


*29 Shabby Chic!


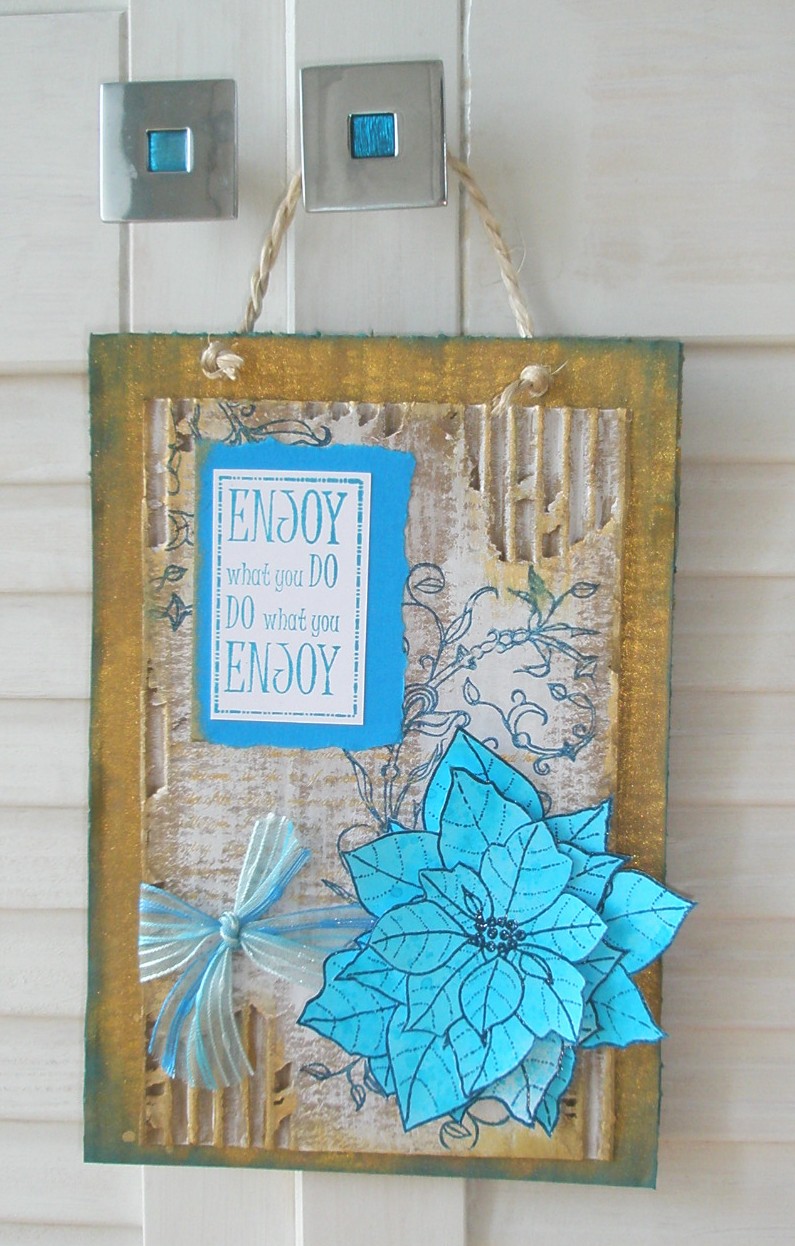
I spotted a strip of corrugated card and decided to go for a shabby chic hanging with browns and blues for my next Poinsettia project.


The base is corrugated card sprayed with Glorious Gold Ink in a Bottle and the top layer is another piece painted roughly with white acrylic paint and edged with gold acrylic. I've used various stamps on this - the Enjoy What You Do stamped in Sea Green Pigment Ink, the Walesby Flourish stamped in Midnight Pigment Ink and the Winter Garden Text stamped with gold acrylic paint. Obviously I've used the large Poinsettia stamp inked with Midnight Pigment Ink on card sprayed with Totally Turquoise Ink in a Bottle. I've just tied some ribbon round the card and finished with some string.

Don't just use the Poinsettia stamp for cards - they can make wall art too!   Check back later for more inspiration!


*28 Tag Calendar

Here's another idea for using the Poinsettia stamp - as December's tag for a  Calendar.


I've gold embossed the large Poinsettia stamp from Oak House Studio twice - once on green card for the base and again on red card sprayed with Glorious Gold Ink in a Bottle. I've cut the centre out of the red one and used the outer leaves for an extra layer.  The layered Poinsettia is fastened on a tag inked with Spring Green Pigment Ink with the Music Background stamp at the top and Winter Garden Text stamp at the bottom.  It's just finished with the calendar and some ribbon.

* 27 Blooming Marvellous


Here Suzee has been having fun with the Ink in a bottle again.

*26 Zentangle Stamped Card

Zentangling is designed to help you relax and maybe do a spot of brain processing. This week during a seminar in Hull I found myself doddling and then tangling today's image which was obviously on my brain. So when I can home I stamped the Poinsettia Stamp in Oak House Studio Colour Chemistry black pigment ink. Then used my usual drawing pen to add the patterning.
For those who want to know I always draw the stamps with a Pilot Drawing pen, I choose the width to work with the design. I started by going over all the lines of teh design with my black pen just to make them a little stronger.

*25 Autumnal Box

  I really love making boxes and Suzee has used some of the leaves from the build your own poinsettia set to frame sections from two different poinsettia stamps. Stunning Colours, what do you think?


*24 Leather Cuff.

This has to be my personal favourite of all the projects this time. Suzee has used Colour Chemistry Ink on the suede side of some leather offcuts she has. She has then embossed the design onto to the leather with Detail embossing powders. Colour Chemistry inks are HERE. Have you got yours yet?


*23 Wedding Gift


Here's an idea using the Medium Poinsettia stamp from Oak House Studio.


I've used some white pearl card that has a slight blue sheen, embossed the Poinsettia three times with silver powder and then cut different layers. Stick together using foam pads and add some beads with Glossy Accents. I've attached it to a present also wrapped in the white pearl card with silver ribbon.

I think the white and silver gives a sophisticated look and would be great for a wedding gift or a bridesmaid's present etc. You could match it to the wedding colours too....maybe colour the bottom layer or just add coloured beads to the centre.

*22 Using Die Cutting

Barbara has made great use of her Papermill Direct stash and some great die cutting for a card that would suit most occasions.

*21 Shutter Card


*20 Delicious Damson

Here's another idea for using the Poinsettia stamp for Oak House Studio's ONE STAMP event.


I've silver embossed the Medium Poinsettia three times on white stamping card and then painted it with Delicious Damson Ink in a Bottle.  I just used a pipette to decant a little ink into a dish and used a paintbrush.  The layers are stuck together using foam pads to give height and I've added some tinsel and a ribbon to create a Christmas decoration. As it's not Christmas yet and I don't have a tree I thought I'd hang it on my Holly outside!!

Don't forget to pop later for more projects from the DT and check out the One Stamp page on facebook.

Saturday, 21 September 2013

* 19 Charming

Here's another idea for using the Poinsettia stamp - use Starlight Silver Brilliance on black shrink plastic to create a little charm.


I also stamped the Mountain Ash and Sycamore stamps to add to the design and allowed them to dry overnight. I trimmed them roughly, punched a hole and then attacked them with a heat gun. I've just added them to three bangles with a selection of jump rings. The Poinsettia looks so sweet that size don't you think.

More ideas to follow so keep checking back here and on the One Stamp page on facebook.


* 18 Traditional Card


Barbara  has used a sentiment from the Peace and Joy set and created a background with the Winter Word stamp.
All stamps can be found here http://www.oakhousestudio.com/ourshop/cat_659529-Christmas.html.

*17 Dare to dream

I am well known for my love of Monochrome, here is Suzee stunning card.

*16 Fast cards for Christmas


Christmas is  the time for faster card, watch out for a few quick projects amongst the longer ones today.