Friday 27 May 2016

Dog Rose Card project from Gwen Fletcher

Take time to stamp the roses


Burgundy ink pad, Dog rose, Smell the roses and dots & dashes stamps.
 
Stamp the dog rose corner twice, onto some patterned paper with the ink. Cut out one full design and then the three single flowers as well.


On an 8cm square piece of white card, stamp the corner again in Burgundy. 
Stamp the sentiment and the dots & dashes around the open corner. 
I love this stamp, it is so clever and if you're not very good at doing dots & dashes and struggle to keep them even and straight, then this is perfect. 
I can see this being in my stash as an absolute go-to stamp all the time. 

Now gently blend around the edges with the same ink. 
These pigment inks are so creamy and blend beautifully.( I used a bit of cut 'n dry to do it).

I

Cut a 12cm square piece of your chosen paper and ink the edges, again using Burgundy. 


Ink the edges of a 12.5cm white square also.


Stamp the single rose all around the edge of a white card, using the second stamped off image for a paler effect. Now blend ink around the edges also.
 
Mount all the layers together. Attach your cut out corner over the stamped image and shape and attach the single flowers to give dimension. Add a tiny pearl to the centres and you're done.
 

That is my last post as part of TAKE 5, 
Thank you for join in 

GWEN x

Tuesday 24 May 2016

Stampbord with the NEW Dog Rose


PURE Colour Chemistry Inks with Stampbord

Here is a new stampboard project with the wonderful PURE Colour Chemistry Inks


Drop the Totally Turquoise, Waterfall, Peter's Pear and a tiny bit of Brazil Nut inks 
directly onto a 2" square piece of Stampboard.
Once dry, stamp and emboss with silver powder, the small dog rose corner.
Then using a scratch tool, Scrape back some of the colour to add 
detail, light and shade to the embossed image.

I

Using the same colours, spray a piece of white card and spray lightly with water to help blend. 
Once dry, die cut a shape and punch a border for your project.


On the back of a piece of acetate, generously dollop Diamond Glaze and into it drip the same PURE inks, (except for the brown). 
Sprinkle with crystal glitter. 
Scrunch a sheet of white tissue paper up and press into the glaze/ink mixture until saturated. 
(I would recommend wearing gloves to do this).


Leave to dry thoroughly, then trim to your desired size/shape.
IMG 7773


I assembled the card as shown, using frosted silver card and silver ribbon to 
complement the embossing and to lighten it a bit. 
The sentiment was stamped using black Stazon.


I hope you are enjoying the challenge. Please Join In x

Monday 23 May 2016

Stampbord Card project by Christine Webb

Take 5 STAMPBORD PROJECT


Materials

5” square card blank (I used linen effect card)
2 x 1” squares of Stampbord
3 scraps of card leftovers (mine were already sprayed using Oak House Studio 
                              Peter’s Pear,  Bramley Apple, Citrus Lemon, Pumpkin Pie and Bottled Sunshine. 

Yummy Chocolate, Triple Meadow Greens, Triple Autumn Leaves,  Triple Fruity Reds.

Texture Elements set and English Garden Words background 

Clear embossing powder.

All three card panels were sprayed with partly diluted pure colour, swiped while wet to spread the colour a little more evenly and allowed to dry.

The square panel (Peter’s Pear) was stamped with the rose background from the texture elements using Pumpkin Pie Pure Colour applied with a sponge, cut to 1.75” square and edged with the orange from the triple Autumn Leaves ink pad.

The large oblong panel (Citrus Lemon and Bottled Sunshine) was stamped using the Summer words stamp and Yummy Chocolate ink pad, cut to 2”x 2.75” and edged with Yummy Chocolate.

The tall narrow panel (Bramley Apple) was stamped using the vine scroll stamp from the texture elements set and the Triple Meadow Greens ink pad, cut to 1” x 2.5” and edged with lightest green from the same ink pad.

The first Stampbord panel was inked with the Yummy Chocolate ink pad and triple embossed. The vine scroll stamp was pressed firmly into the final still molten layer and left till it was set. A solvent-based ink pad was rubbed across the embossed design to highlight it.

The second Stampbord was swiped with citrus yellow pure ink and allowed to dry. The large single flower stamp from the texture elements was stamped in the brightest shade from the triple reds ink pad. This was dried then triple-embossed using a clear ink pad.


The panels were assembled on the card and attached with 3D glue gel. Then a selection of circles was punched out of leftover scraps of inked card using a standard-sized file paper punch and added to the finished card.

I really hope you are tempted to try Stampbord Don't forget to show us what you make!

Sunday 22 May 2016

Stampbord Project

Lovely post from Katy Leitch 

Stampbord Notebook


I love making notebooks, especially as little gifts! I found the ATC Stampbord was just the perfect size to create an embellishment for the front of an A7 size notebook.
1 Sponge the ATC-sized Stampbord with Pure Colour Chemistry inks in Citrus Lime, Peter’s Pear and Bottled Sunshine.
2 Spray the Circle Grid Background stamp with a light mist of water and press into the inks to create the pattern you see in the background. Allow to dry.
3 Stamp the image from Texture Squares along the bottom edge with a Meadow Greens Triple Colour Chemistry inkpad. Ink up only part of the stamp and stamp with it in your hand rather than on a block to create a less solid image.
4 Stamp the lines from Daisies and Rainbows onto the Stampbord in black. Turn the stamp upside down and stamp again over the top of the first stamping, to add more circle details. Doodle a border with black pen.
5 Colour a piece of card with Colour Chemistry Acrylic Ink in Diva. Stamp lightly over the top with the roses image from Texture Squares. Hand-draw some hearts onto the card and cut out. Add the hearts to the top of the stems and add a sticker quote.
6 Stamp the Circle Grid onto a black notebook with white pigment ink and glue the ATC to the front.


PRODUCTS:
Citrus Lime and Bottled Sunshine. 
NB Lynnda has this stamp on offer this week #treattime

Are you joining in?
Katy 

Saturday 21 May 2016

Playing With Stampbord Tiles, Inks And Stamps

Hi everyone Sylvia here with an idea for using those small  stampbord tiles you get in a mixed pack.  This is my first attempt at using the stampbord and I love it.  The inks took well, it was easy to emboss my stamped image and I had fun gently scraping away the colour to lighten areas of the stamping.


 These two tiles were coloured with Oak House Studio acrylic inks by Colour Chemistry.  A dabbing technique using a blending tool was used on the ATC dragon stamp tile and the dragon was heat embssed with clear embossing powder. colour was just dropped onto the fireworks set stamp tile using a pipette  this image was not heat embossed and I used a scraping tool to remove some colour.   I punched a hole in this tile and intend making a key ring with it, the dragon will be mounted  in a frame when I can find my specialist oriental papers I have (put away safe!) somewhere.

http://designsforoccasions.blogspot.co.uk/

My third attempt was coloured and stamped over three oblong tiles, I fastened them together with masking tape on the reverse before colouring.  I used Pure Colour Chemistry inks for this project in Paris pink and French mint and the triple butterfly set for stamping.  When finished they were mounted onto a square of card coloured some time ago with  totally turquoise and a flick of French mint inks and placed it in a frame.


I hope you have been inspired to try some stampbord colouring and stamping.  My efforts are not perfect but I enjoyed making these little pieces of art and was very pleased with the results. 

Sylv xx

Monday 16 May 2016

Pure Chemistry Inks and The Double Daisy Stamp

Hello Sunshine


WOW! The Pure Colour Chemistry inks sure pack a punch!!! I’ve used them quite concentrated, with a spray of water for this project and you get a really bright, almost neon smack of colour – fab! I’m really loving this product!

1 Heat emboss the image from Double Daisy repeatedly in white onto a piece of card.
2 Add droplets of Pure Colour Chemistry Inks in Bottled Sunshine, Paris Pink and Pumpkin onto a printing plate or craft mat. Spritz with water.
3 Dip the embossed piece of card into the inks, repeat as desired, drying between layers. Mat onto black card then onto a white card blank.
4 Stamp the word ‘sunshine’ from Daisies and Rainbows onto card and cut it out. Add to the card with a die cut sentiment and some strips of black cardstock.


Have fun when you get inking. Katy x

Wednesday 11 May 2016

An Adventure with Colour Chemistry Inks By Katy

So we saw what happened when Gwen got her parcel, here is what happened when Katy got hers. I am pleased they both really enjoyed using the Colour Chemistry Inks. 
They do make being creative easy!

Leaf Cards


I love this Mountain Ash Leaf stamp – it’s so pretty and incredibly versatile. 
Here I’ve used it all on it’s own to make pretty all-occasion cards but it’s great teamed up with a flower stamp too.
Stamp the sentiment (from Daisies and Rainbows) onto a square white card blank using black ink. Stamp the Mountain Ash Leaf repeatedly onto the card surrounding the sentiment using the Meadow Greens Triple Colour Chemistry inkpad. 
This inkpad makes stunning cards so easy! I made this card at my craft group and several people asked me how I achieved the multiple colour tones!
For the second card, I painted watered down Pure Colour Chemistry inks in French Mint and Citrus Lime onto piece of card. I simply stamped a sentiment and the leaves with Meadow Greens Triple Colour Chemistry inkpad to finish.

What I used: -

Katy x

Now over to you creative folk, did out your Oak House Studio stash and have some creative time, you know it will make you feel good. Don't forget to post it and tags us so we see it.

Lynnda

Sunday 8 May 2016

PURE Colour Chemistry adventure with Gwen Fletcher

I know we are doing Stampbord this month and I hope you will all carry one with the challenge, but a couple of the TAKE 5 team this month got to work with the PURE Colour Chemistry inks for the first time. To Say I think they like them is a bit of an understatement, so I really wanted to show you what they made and as it is my company...
 Flippin eck I can can do it!  If you haven't had a play yet what are you waiting for? come on they even make sense economically too! 
Lynnda x

Take time to Smell the Roses # a Stamp and Ink Adventure.


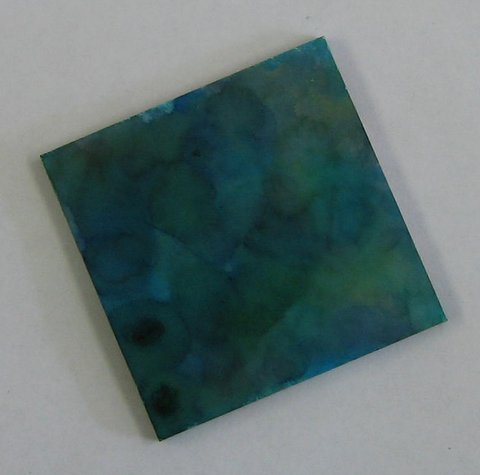
I have been playing with the Pure Colour Chemistry inks and I have to say, they are absolutely brilliant. The intensity is deep and they are perfect for creating backgrounds, your own sprays, painting with and oh - so much.

I mixed half a small spray bottle with water and 2 drops of Pumpkin Pie and another with 2 drops of Jubilee Red ( a fantastic proper blood red). 
Then I sprayed a 14cm square piece of white smooth card, lightly misting across the card with a combo of both colours.
Now I added a further 2 drops of each colour to their bottles to intensify and generously sprayed a 10.5 cm square white card to give deep colour and complete coverage.
Allow these to dry thoroughly. 
What I found really interesting was that the inks gave a sort of mottled finish rather than completely smoothly blended. So this made me think that they behave with water a bit like Distress inks do. I will have to experiment some more with pure colour and then spritz with water to see whether they wick or not.

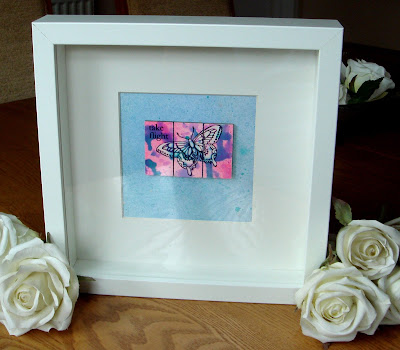
On the larger, paler card, I stamped the flourish multiple times around the edges, using Triple Fruity Reds. Although these are pigment inks, they are a hybrid and so will dry without the need to heat emboss and I found they dried quite quickly. You can also heat set if needed. I then highlighted parts of the swirls with an opaque white pen.


On the smaller, stronger coloured piece, I embossed the beautiful elegant Rose with white embossing powder.
Then, I painted the image with bleach. ( You need the thinnest, cheapest bleach you can find. Your posh, thick stuff doesn't do it).
Again, interestingly, as the bleach developed, the initial mottling I mentioned, was retained, giving a really interesting look. You can keep painting over with the bleach until you achieve the desired finish but do allow it time to develop first as it can take a little while.


I mounted the layers together, adding some silk ribbon which I also sprayed to match and crinkled across using strong tape. Mount on a white card, add a sentiment using the dark end of the triple ink pad et voila!
Hope you like it.
Gwen.


I hope you enjoy using Oak House studio products as much as I am doing. Gwen x

Products Gwen used


I hope you are enjoying our TAKE 5 Season and hope you will be inspired to show us your creative adventures with Oak House. Post your project on you blog or Facebook page and tag Oak House Studio to let us know it is there. 

Lynnda x

Tuesday 3 May 2016

Stampbord Challenge project

Wow May is passing so fast, here is a stampbord project from Katy Leitch. I was really pleased that Katy agreed to join us this month. Here is just a first post from her lots more to come.

UTEE Pendant


As Stampbord is so thick and sturdy it makes a great base for UTEE – it won’t buckle or go out of shape no matter how your heat it!
1 Remove the corners of a Stampbord piece with sharp scissors (Tim Holtz scissors are ideal). Triple emboss with blue UTEE, then gold, then blue.
2 Stamp the Texture Squares image into the molten UTEE with black ink. Reheat the UTEE and stamp into it again, while still molten, this time using Versamark or other clear embossing ink. You can see the pattern of black lines underneath the raised pattern which I think looks cool!
3 Highlight the raised areas with gilding wax. Punch a hole and finish the Stampbord piece with a spacer bead and chain.


If you want to try this yourself you can find these essentials on the Oak House studio website