Showing posts with label acrylic inks. Show all posts

Sunday, 25 September 2016

Stampbord Thoresby Trio


For this project I've used a piece of MDF bought from the pound shop to create a pretty wall hanging.


I've painted the base with two coats of Tanzanite Acrylic Ink which gives a lovely glossy purple (sorry bit difficult to photo) and edged this with silver Treasure Gold.  The 3 pieces of Stampbord are inked with Orchid Pigment ink and once dry I've silver embossed the Thoresby stamps (from the Texture Squares set).  The centre one is the positive design and the two smaller ones are the negatives.   I've just added  the beaded chain and some beads.

Don't forget to leave a comment and come back to see more projects from the Design Team.  Also check out the INKSPIRED group on facebook for more info.

Elaine x

Saturday, 16 May 2015

The wilderness with Colour Chemistry

Hi everyone its Katie back again with another layout. This time i have used the new Apple green mister and Diva Acrylic Inks.


This photo was taken at Lulworth Cove in Dorset its such a calming place. I started off by randomly applying texture paste to the page.


To create the distressed rose i painted it with crackle paste and let it dry before painting with the Diva Acrylic ink and dabbing with Vintage Burgundy to show the cracks up.


I stained the paper flowers with Peridot Acrylic Ink and left it to dry. If you use white or cream flowers you can use the injs to dye them any colour you need.


Mix inks into texture paste to create new colours. I used the Acrylic ink so this but the Inks in a Bottle work as well.


Here are the products i have used

Colour Chemistry Acrylic ink Diva
Colour Chemistry Acrylic ink Peridot
Colour Chemistry Inks in a Bottle Bramley Apple
Colour Chemistry Inks in a Bottle Paris Pink and French Lavender
Colour Chemistry Inks in a Bottle Vintage Burgundy

                                            Thank you for visiting

Friday, 15 May 2015

A burst of citrus with Oak House Studio


Hi its Katie here with a new mixed media layout. I used the bright and cheerful citrus inks in a bottle.


 Mix some Peridot Acrylic ink with white texture paste and apply to your chosen stencil.


Next apply texture paste to the rest of the layout randomly and let dry before spritzing citrus yellow, citrus green and Pumpkin randomly across the page allowing the inks to blend as they dry.


            Customize paper flowers by dipping them into Acrylic ink or spritzing them with inks in a bottle.


Use the mini texture stamps to add interest to your page by stamping them randomly on the layout.


Thank you for visiting please leave us a comment and here are the products i used.

Colour Chemistry Inks in a Bottle


Stamps


Monday, 17 November 2014

Winter Challenge with Oak House Studio stamps


O' Christmas Tree

Oak House Studio Christnas tree stamp

Products used in the making of this card include 

And a selection of Glitter Glue for baubles and swags.

Stamp the Tree using the Forest Green ink pad, and in Lemon Yellow for the star. Paint the star using the gold Acrylic Ink, then using the Malachite Acrylic Ink paint the tree using small strokes of a fine paint brush. For the trunk of the tree blend acrylic inks to make brown.

Spray the background of the tree using a choice of the bottled ink colours that you like, you can either mask the tree or use a piece of kitchen roll to take the colour off the tree before it dries. I finally allowed the gold to almost dry and then using downward strokes of the kitchen roll take off the excess ink to leave a sparkly finish in places to the tree.

Finally stamp the sentiment I used a Fired Brick ink pad for this. Then mount onto a piece of card of your choice. When this is done take the glitter glue to decorate your tree.

Thank you for looking

Love Doreen


Sunday, 16 November 2014

Big Christmas Collection Wreath

Elaine here with a traditional Christmas wreath card made using the Big Christmas Collection - a set of 17 small stamps including poinsettias, hellebores, leaves and baubles etc.


For this card I used the Fir Sprig stamp to create the wreath - I lightly drew a circle, stamped on the line with the Fir Sprig and embossed it with Gold Detail powder.  In the centre I gold embossed the Wishing you a Merry Christmas sentiment and using 2 masks (1 to cover the sentiment, 1 to cover the wreath) I stamped the Winter Words with Wine Pigment Ink.

For the foliage I've used Gold, Red and Welbeck Green embossing powders and painted with Acrylic Inks - Malachite for the Holly, Ruby and Emerald for the Poinsettia flowers, Garnet plus Glorious Gold Ink in a Bottle for the Hellebores and Emerald and Citrine for their leaves.  I've also used Citrine to colour some white beads for the poinsettia centres and finished by adding some red beads for the holly berries.

Hope you like and are inspired to have a go.  A Christmas wreath is definitely wintery - why not have a go and join in November's Challenge.  All details are on Facebook.

EDIT from Lynnda This is a a BIG stamp set, 17 stamps! the normal price is £19.50 But I have decided to make this stamp of the week and until next Sunday it will be just £14.50! 

Saturday, 11 October 2014

One Stamp Christmas Corner Decoration


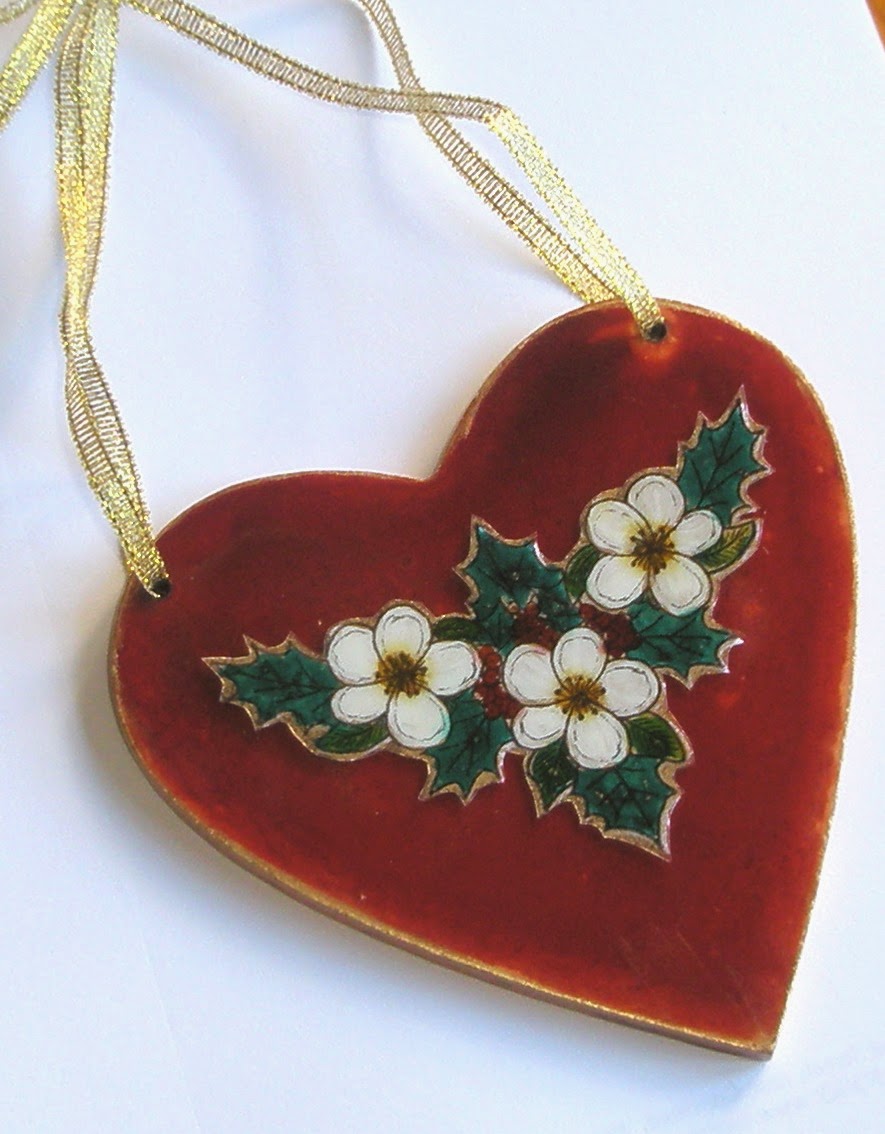
Elaine here with a Christmas decoration for my ONE STAMP project using the Christmas Corner stamp and Acrylic Inks.


This started off as a hanging from the 99p shop - a heart and rectangle strung together with a bit of twine.

I took it apart and decided that the Christmas Corner stamp would fit well on the heart so I've sanded back the cream paint a little and given it two layers of Ruby Acrylic Ink. 

I've stamped the Christmas Corner on some acetate and then painted on the reverse with the Acrylic Inks:
Ruby for the berries
Emerald for the Holly (2 layers)
Emerald and then Citrine for the Hellebore leaves (I haven't bought the Peridot yet!!). 
Citrine for the Hellebore centres.

I then used white acrylic paint for the Hellebores and to add yet more shine, I painted all over the back with gold acrylic paint, mounted on some white card and attached to the heart.


The Acrylic Inks dry beautifully on the wood and acetate so I'm thinking they'll be great for glass painting too.....and they are such a deep vibrant colour.

Thanks for looking and please pop back to see more projects from the Design Team.


Wednesday, 8 October 2014

Create a Picture with Rubber Stamps

Hello everyone hope you've had a wonderful weekend.  Today I'm going to show you how to create a picture using rubber stamps.  In the picture below I have used the Scroll Frames rubber stamp as an edge to a page in my journal.  I stamped it with the midnight ink pad  and then used a damp paint brush to move the ink around the swirls to add some shading to them.  I've added some pink highlights with some neocolor II water soluble wax crayons and added some black dots with a copic pen.  

The trees I made using one of the 2 inch Journal Circles and added colour with the wax crayons.  The dots, edge of the circles and the tree trunks were painted with the black acrylic ink to which I added some white acrylic paint to make them 'pop'. 

For the grass I used the fir sprig stamp from the Big Christmas Collection and stamped it using the spring green ink pad.  


This young lady was a happy accident.  I was playing around with the stamps as you do when you first get them and as I stamped the larger of the scrolls I thought 'oh hello' this looks like curly hair.   I added some more 'curls' with the smaller swirl and hey presto a full head of curly swirly hair.  Don't you love happy accidents?


Thank you for popping over and reading my post. 
Have a wonderful week crafting.
Anita