Monday 31 October 2016

600th POST Lynnda ~ Layering up your Colour Chemistry PURE Inks

600th Post

Welcome to the 600th post on this blog, of course, I could not have possibly written 600 posts myself, and I must congratulate the whole team for all the brilliant makes they have blogged to achieve this milestone. I always intend to blog more often, and I really am amazed that some people manage to blog every day. 
So how shall we celebrate?
Let's have a prize! 
Leave a comment to enter ~ why not tell us what you favourite project has been so far? OK, let's get on with the post itself.

Layering up your PURE inks


You can create some really interesting "loose effects" stamping with just Colour Chemistry PURE Watercolour Inks. Include some pigment ink too and you give the ink more body and get a very different look. You can use similar colours or combine colour as always the choice is yours. 
Here is a little video with me trying to show you exactly what I mean by that.


I was using the Moutain Ash Leaf stamp or you could treat yourself to a great collection of leaves. Lynnda's Leaves is a great way to have a good selection of leaves, 

I was using several sprays all made from Colour Chemistry PURE inks. The colours I used were Citrus Lime, French Mint, Citrus Yellow, Peter's Pear. 
For my ink pads, I chose Colour Chemistry Pigment Ink Spring Green and Triple Vintage Browns.


So don't forget to leave a comment and I will draw a winner on Friday. 


Sunday 25 September 2016

How to Kiss Stamp ~ Using the Thoresby stamp from Oak House Studio

Using pigment ink to kiss two stamps together.

I really enjoy the possibilities you have with kiss stamping, stamps are versatile but when you combine two stamps together you get an even bigger range of outcomes.

The key to kiss stamping are have two stamps, one that is solid and one that is more textured.
The Thoresby designs could be either of these. In this video I have used it combined with solid circles and so the Thoresby acts as the texture stamp.
The other essential is using an ink that stays open for a while, this is tech speak for an ink that dries slowly. Oak House Studio pigment ink pads are ideal for that,
In the video I have used two triple ink pads. 


Maybe it is time to treat yourself to some new craft goodies?
Check out the SHOP we have lots of offers still on.
I hope you have been enjoying the weekend.

You can keep posting your makes all week.
THANK YOU for all your help and support.

Lynnda

Simple Square Card with Embossing Powder

Using Embossing powder to make a square card.

I do love a square card.
They are easy layouts to workout and they always look classy.
This is such a simple card idea but so useful. You could add almost any sentiment to this type of card. In these colours would look great for Christmas, 


You can find everything here
I hope you are enjoying ONE STAMP. Please leave comments and share for me.
 It really helps xx

Triple Fruity Red & Thoresby Stamp


Here's my next project using the Thoresby stamp and the red pigment inks.


For the central part I've used  the Triple Fruity Reds pigment ink pad and stamped both the positive and negative Thoresby stamps from the Texture Squares set .  Just in case you are confused the positive stamp is the darker red and the negative is the lighter red at the other end.  For the background border I used Crimson pigment ink on orange card which gives it a little bit of an indian feel.  The Happy Birthday is from the Build Your Own Sentiments set.

Hope you like it and thanks for visiting.   Don't forget to leave a comment and pop back later to see other projects from the Design Team.   Also check out the Inkspired page on facebook for more projects.

Elaine x

Altered Wooden Beads

Stamping on Wooden Beads

This is more of adding my personality to something well made but plain. This project was one of those "well that wasn't what I expected it to do, BUT I love it!" projects.

I bought these beads some time ago, I think they would have have 90p a string maybe a little more... off to try and buy some more now anyway so I can update you on that.

I decided that it would be easier to stamp on several beads at once in i left them on the string. So I stamped the first string great, and called Ben in to film me stamp the rest... yep you guesses it, didn't work as well. Some of the more tightly strung beads didn't lie as flat, so when I do this again I may restring the bead myself and leave small gaps between them.

Anyway here is the video. 


The archival ink bleed a little but I like the effect. the staz on was darker. 
I loved the combination of both.
I might add some of these to the wash bags. 

Lynnda

Classic Christmas tags # Stamping and embossing

Using Embossing powder to create Christmas tags.

Whilst I have made this a Christmas project BUT  this would work well for any occasion and I love the way that Thoresby as a texture is neither male nor female. It is just fabulous. 
I also love that by using the positive and negative I can quickly and easily achieve coordinating pieces. 


I love tags great for quick projects. 
A really wonderful tag can really make any gift look special.


I use the square positive and negative square Thoresby stamps with Versamark and Gold detail embossing powder.


I really got going on with this and made several. 
I could see they would be good for projects other than Christmas.
For the Christmas one I had a poinsettia and some baubles. 
The poinsettia had been stamped and embossed with the same gold detailed embossing powder.


Here I have used some Oak House Studio Tags and of course the Thoresby Square Positive and Negative stamps.
Gold Detail embossing powder
Versamark or Alchemy Plus ink pad. 

Thoresby Plaque

Upcycling using stamps

As you may have gathered by now you don't just have to make cards with stamps and a trawl round the pound shops usually provides some sort of base for a project.  This time I've chosen a large plaque with a raised heart in the middle.


I started by painting the base, added grunge paste in places and stamped the Thoresby stamp into this.  In other areas I've added structure paste and some bead gel to create a lovely textured frame.


Once this was all dry I painted it with Decoart Media Fluid Acrylics - Prussian Blue Hue and Quinacridrone Violet - and dry brushed to highlight the texture.  I've also added some Treasure Gold in Pewter for more highlights. 

For the central heart I've used some card sprayed with Totally Turquoise Ink and some Ultramarine Brushos.  I've silver embossed the Thoresby Square and inked the Large Thoresby Stamp in purple ink.  As a feature I've triple embossed the Thoresby stamp in silver on a heart shaped piece of chipboard and added a few words from the You are my Rainbow set. 

I really enjoyed making this and hope you like it.   Don't forget to leave a comment and pop back later to see other projects from the Design Team.   Also check out the Inkspired page on facebook for more projects.

Elaine x


Altered Wooden Pegs

Using inks and stamps to alter some plain wooden pegs.

This is a repeat of something I have done before, but wanted to make some more as a gift for my favourite niece. 

These wooden pegs have been sprayed with pure ink in a plastic box and left to soak up the ink.


I did this before the weekend and left to them to dry naturally. 
I wanted to have different tones so some were sprayed with water to get a softer look.

I stamped the pattern on to the peg using versamark ink and silver detail embossing powder. See how I did that on this video.


Well I have lots more to show you so keep your eye on the Facebook page and the blog.
Spread the word using the buttons below this post, 
Lynnda x

One Stamp - Thoresby Squares and Sunflower

ONE STAMP project for Oak House Studio

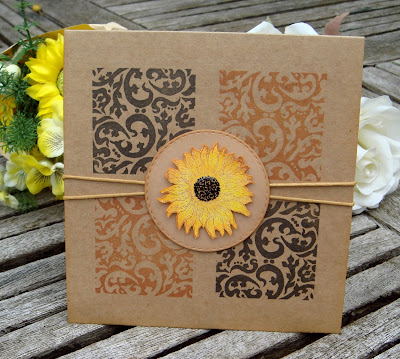
Hello everyone, I hope you are all enjoying the weekend and joining us in the September One Stamp event.  Here is a quick card using the Small Thoresby Backgroud stamps from the Texture Squares stamp set and the Small Sunflower stamp.


The possitive and negative stamps were lined up on a large acrylic block, inked up with Black and Sepia pigment ink and stamped onto the card, reversing the block for the lower stamping.  The small sunflower was stamped, embossed and fussy cut, then coloured with Lemon Yellow and Golden Yellow pigment ink using a blending tool.   String was fastend round the center of the card and the sunflower was mounted onto a die cut circle and attached to the center of the card.


The insert was stamped with the Small Sunflower, coloured and the Sunflower Sentiment added.

Enjoy the weekend and don't forget to let us see how you use the Thoresby background stamps in your creations.
 
Sylv xx

Inky Backgrounds and Gift Cards


A while back I did some backgrounds using the Pure Colour Chemistry Inks on watercolour paper - all blues and greens including Waterfall, Blue Jeans, Vintage Green and Peter's Pear.   One sheet I used for my first card this weekend and this one ...... I overdid the Vintage Green and when it dried I was mightily impressed with the elephant I created.


Can you see it?   Big flapping ears and 2 legs and a trunk!!   Well I can see it but the rest of my family think I'm strange......!   


Anyway I've cut it up and used it to make a couple of Gift Card holders.   I've inked the reverse, folded it to create a little pocket and added some stamping with the Large Thoresby Stamp and Good Luck  using the Build your own Sentiments set     It's that time of year when students go back to Uni and every scrap of money helps - my two have both finished so now it's good luck finding jobs!!


Hope you like this idea.  For more keep checking back and visit the INKSPIRED group on facebook too.

Elaine xx
 

Stampbord Thoresby Trio


For this project I've used a piece of MDF bought from the pound shop to create a pretty wall hanging.


I've painted the base with two coats of Tanzanite Acrylic Ink which gives a lovely glossy purple (sorry bit difficult to photo) and edged this with silver Treasure Gold.  The 3 pieces of Stampbord are inked with Orchid Pigment ink and once dry I've silver embossed the Thoresby stamps (from the Texture Squares set).  The centre one is the positive design and the two smaller ones are the negatives.   I've just added  the beaded chain and some beads.

Don't forget to leave a comment and come back to see more projects from the Design Team.  Also check out the INKSPIRED group on facebook for more info.

Elaine x

Saturday 24 September 2016

ONE STAMP Thoresby Stamp

Add Personality ~ Using Stamps to upcycle washbags from Ikea.

I love these wash bags from IKEA, they are cost effect do the job and the PINK one a great colour. But many of you will know I am going through a rather extent green and blue phase so I dug out a set of blue ones I had stashed away, but pretty sensible navy blue... So I have started the process of adding some personality to them.

So going to use some acrylic tags and some staz on ink to add a touch of Thoresby to them,
Teal Blue Staz on of course ( I will get this ink pad on the website as soon as I can, message me if you can't wait that long as I do have a little stock).


I have stamped the pattern on the the tags, let it dry  & then used some cord to add it to the bag.
I am going to add some bead oddments and maybe even some odd earrings.
 (because we all have some of them saved don't we),


Hope you are joining in at home and I hope you have enjoyed the first day. I will be back again between 8am and 8pm tomorrow with different projects so please come and watch or even better join in. 
Please keep sharing and spreading the word , it really does help little businesses like me working on my own at home to keep going.

Lynnda 

Thoresby stamp with Brushos


Here's my next project using the Thoresby stamp, inks and Brushos.


Now I know you can use the Brusho powders to create your own inks but here I've used Pure Colour Chemistry Inks as the base and added the Brushos to get that 'spotty' effect.  In this case Dark Brown Brushos with Glorious Gold Pure Colour Ink.   The darker section is Yummy Chocolate and Glorious Gold Inks left to dry with salt crystals - I love the mottled effect..


The main element is created using Soft Relief Paste in Gold (made by Colourcraft like the Brushos) spread on the Thoresby stamp with a palette knife and left to dry.   You just then peel it off and use on your projects - it's flexible too so can be shaped.  This is the reverse of the piece used on the project!   I've finished the card with more stamping with Triple Vintage Browns - the small Thoresby stamp from the Texture Squares and the sentiment from the Friendly Words.

Hope you like it and thanks for visiting.   Don't forget to leave a comment and pop back later to see other projects from the Design Team.   Also check out the Inkspired page on facebook for more projects.
 
Elaine x

One Stamp - Teabag Christmas Tree Tag


Hi Sylvia here with a One Stamp project, a tea bag folded Christmas tree tag.  The small Thorsby background stamps from the Texture Squares stamp set  is an ideal size for teabag folding and gave me the idea to make the Christmas tree.  I cut four different sized squares using dies and stamped them with the Thoresby stamps using the Thoresby Positive Square and Triple Meadow Green pigment ink pad .  The squares were folded and layered to form the tree.


The tag background was stamped with the Thoresby large background with clear embossing ink and heat embossed with clear embossing powder.  Sepia and Green Oak pigment inks were sparingly blended around the edge and over the tag.   I then stamped over the tag with Music Background, words from  the Deck The Hall stamp set, and the Snowflake Collection using Yummy Chocolate pigment ink.   The tag was layered onto burgundy card and a banner stamped with the Sending You Peace & Joy sentiment.

Sylv xx

Composing Your Own Stamp patterns.

How to use the cut up version of the Thoresby stamp

As I said before I designed this a stamp set to be cut to make your own patterns, many people including me have taken the easy route and kept it all together as a lovely big background stamp that works great as a palette stamp too.
Si I guess it is time to show you a project with it cut up as I originally planned. It is very tightly packed so just take you time and cut out the stamp using a pair of scissors.


I chose this group of 4 stamps to create the main feature piece for the front of a birthday card. This is when you have a good play, ink up your pattern and test it out. 
Move the pieces closer together or further apart swap and change them until you have a pattern you are happy with.


I wanted a softer piece for the background, so I created a new group and stamped a larger piece of card using second generation prints.


With my two pieces stamped I trimmed them down & began to add layers to make the front of a card.


I stamped the  sentiment using the same Sea Blue Pigment ink pad. I did a little spot embossing by added copper embossing powder just in a few areas of the stamped sentiment.
To mat the sentiment a used a large version of the Thoresby Pattern. This time stamped in Fore Brick pigment ink on a mottled cream paper.


 Front all layered up.


I have used the larger pattern to stamp this middle piece which will have the same colour paper layered in the middle BUT I decided to do the writing but before I glue it in! 
You can find the large Thorseby stamp HERE
And the pigment ink pads HERE 

Please leave a comment and please share the post using the buttons below.

Lynnda xx

One Stamp - Stampbord Inchies


Hi Sylvia here with another One Stamp Project using stampbord inchies and the Thoresby background stamps.  These tiny Stampboard squares were coloured with  Powder Blue pigment ink  stamped with the Thoresby Positive and Negative Squares and made into a bracelette with leather cord and blue beads.   


Keep posting your makes in the Facebook Group Inkspired by Oak House Studio, add to your own Facebook page, or blog your makes on your own blog but don't forget to tag Oak House Studio so we cans see what you have made, we love to see what wonderful creations you come up with.

Sylv xx

Wonderful Thoresby Canvas


For my next project I've used a small canvas with inks and the Thoresby stamps.  The canvas is from a shop called Tiger which sells lots of inexpensive stuff - this canvas was 50p - but despite that it took the inks really well.


I lightly sprayed some French Mint Pure Colour over the canvas and then stamped the large Thoresby Background with Spring Green Pigment Ink.   Next I mixed some structure paste with Peacock Green Pure Colour and spread this through a dotty stencil.   Once this was dry I added some dots of Gold Acrylic Ink and the triple embossed elements - for the circle I used the positive stamp from the Texture Squares set and Wonderful is from the Build Your Own Sentiments set.


Thanks for visiting the blog and I hope you like my canvas.   Don't forget to leave a comment and pop back later to see other projects from the Design Team.   Also check out the Inkspired page on facebook for more projects.

Elaine x

One Stamp - Butterflies And Swirls


How is your weekend going, have you had time to join us for the One Stamp Event?  

Here is another card I made using the Thoresby Large Background stamp.  This started out as a piece of background I was going to discard because the Thoresby background had not stamped cleanly onto the linen card using the Triple Sunshine Yellow pigment ink pad .  A little bit of blending with Powder Blue pigment ink and I really liked how pretty it looked, I added a few powder blue butterflies from the Butterfly Bundle stamp set  and the Without Change sentiment in black.

                      
Die cut shapes topped with butterflies from the butterfly bundle were added, these were stamped and embossed and coloured with pigment inks.

Sylv xx

One Stamp - Rainbow Pinwheel


Sylvia here with another One Stamp project, I have used teabag folding to make the pinwheel stamping with the  Thoresby Positive and Negative Squares.  I stamped out the squares using a selection of bright coloured  pigment inks, cut out the squares and had a play folding and slotting them together to get the pinwheel.  The center was covered with a button and the pinwheel attached to a white linen die cut panel.  A larger Thoresby background was stamped in lemon yellow pigment ink onto white card and layered onto intensive blue card,  the pieces were matted and layered onto a white linen card blank.   The sentiment is part of the You Are My Rainbow sentiment stamp.


Don't forget to let us see what you have been making this weekend, we love to see your creations.

Sylv xx

Using the Thoresby Stamps - No 1


It's that time of year again when Oak House Studio have their ONE STAMP weekend - I know it's obvious but it's a weekend to use and show off just one stamp design.   This time Lynnda has chosen to use the THORESBY background.


It comes in various sizes and the ones I have include the large background stamp, the positive one and the smaller two are from the Texture Squares set designed more for silver clay, polymer clay etc.
These have just been stamped in the Triple Sky Blues pigment ink pad.


To start I've used the large background stamped twice in the Triple Sky Blue ink over an inky background. This is a mix of Pure Colour Chemistry Inks - Waterfall,  Blue Jeans, Vintage Green, Peter's Pear and Citrus Lime.   I've mounted the piece on white linen card,  added the Creativity sentiment and blinged the dots in the pattern with some gems!

Hope you like it and thanks for visiting.   Don't forget to leave a comment and pop back later to see other projects from the Design Team.   Also check out the Inkspired page on facebook for more projects.
 
Elaine x


ONE STAMP weekend September 2016

Well I am up and my apron is on, I have to say I was wanting to use newer technology for you all to see things in real time, at the moment that just isn't happening.

But we have lots planned and I have several projected started with some prep done, so now it is 8 am I am just going to get on start crafting. I really hope you will join in.

Please Join by crafting along with us and posting your makes, but even if you can't get crafting this weekend you can join in, with comments likes and shares.

At the bottom of every post on the this blog there are social sharing buttons, it would be really great if you could press one or two and share you favourite posts and makes.


Love Lynnda xxx