Sunday, 31 July 2016

TAKE 5 ~ You are my Rainbow by Lynnda Worsnop

 Four fold card - For Martin


It is our wedding anniversary this week, so I need to make a card for Martin,
 I also wanted to make something colourful to be part of this months TAKE 5. 
I and just to make sure I am on theme I used the rainbow words set, I think they they really helped me thank Martin for all he does for me.


Time has been short recently so no real time to make anything with with lots of work, but think I managed something for the man I love. 

The card was made from 4 panels. the inner panels is 14 cm square. I used the large Thorseby Stamp and treated it a little like a geli plate. The colour is the form of Pure inks over some pigment inks. 
For a spot of double inking. 
If that is not something you have seen me do, I ink the stamp in the normal way using the pigment ink pad. The PURE inks are splashed on my glass mat and spread them around a little.
The inked stamp in then  bounced  into the PURE inks.


Pure inks I used Lemon, Bottled Sunshine, the Jubilee Blue and French Mint.... not all at the same time.


Pigment inks I used Sea blue and Spring Green on different panels
.
The Rainbow words were stamped in Midnight Pigment ink.
I have used linen card for the panels which are then mounted on black linen
The long card is hammered card.


The new challenge starts for August and the new theme is words. 
So what are you waiting for?

Come and join in, make a project using any Oak House Studio product.
 Post your project on your blog or on your Facebook page, Just let us know where it is.

Good Luck 
Lynnda 


Friday, 29 July 2016

Take 5 Rainbows - Stamping project from Lynnda Worsnop

Rainbow Stamping - Leaves


Today was one of those I need a card quick days. This simple design is one I have used for fast cards for some time. Always a little tweak but the same basic idea I keep coming back to. 
Unusual for me to use so many colours but the prompt did say rainbows and lets face it the Colour Chemistry Ink pads are so lovely and colourful it was hard to stop using extra colours. I used Valentine, Spring Green, Orchid, Lemon Yellow and Midnight.

To pull it together I  used the same stamp and a single colour Sea Blue to create a mat and stamp the words.
A lovely card made with two sheets of stamping card, one for the base and one to create the two layers, Nice and quick.

I have enjoyed the Take 5 this month and I hope you have. 
Did you join in? why not join in for next months challenge ? there could be a prize.

Lynnda x


Friday, 22 July 2016

Abstract project by Eileen Godwin


Today, I just fancied creating a bit of 'Abstract'.... as yer do! 
And, as I also love colour, I enjoyed making this card 
featuring Oak House Studio Circle Stamps.  
You can find them here OAK HOUSE STUDIO web shop.


I used stamps from both sets of the Journal Circles
plus others from the Circle Collage Stamps set. 
I'm not sure what catches my imagination about 
the 'circle shape' but I use these stamps a lot 
so they were a wise investment for me. 


They make a great background. 
Thanks for looking today and thank you to Lynnda for asking me to be a guest designer on The Oak House Studio Blog.
Great Fun
Eileen X

Thursday, 21 July 2016

You Colour My World by Angela Dodson

Angela Dodson – You Colour My World
Hello, its Angela here again to share a simple card design step by step created with Oak House Studio products.  As the theme this month is Rainbow Colours I thought I would make use of those fabulous Triple Ink pads, there are enough to cover the whole rainbow.  I started by stamping circles onto white card, using the lightest 2 colours in each of the triple colour ink pads.  (The circle stamp I have used is from the Flowers & Circles stamp set but I notice that a brand new set of Circle College stamps has just appeared in the Oak House Studio Shop, perfect timing!!)  I stamped a butterfly onto each circle using the darkest shade from each of the 5 triple ink pads so that each circle was colour coordinated and when dry I used a circle die to cut out which also left a little white border all around. 


The card base is simply an A4 sheet of Papermilldirect White Linen card, one of my favourite card textures, scored, folded and trimmed to approx. 7” x 5” card base.  I chose the sentiment stamp ‘You Colour my world’ stamping the words in black Memento ink along the bottom of the card base, apart from the word ‘Colour’ which was fun to stamp using the triple inkpads to give a rainbow effect to the word. 

To coordinate with the black ink and add definition to the circles I cut an extra panel of white linen card approx. 3” x 7” and matted onto black card to give a small black border top and bottom, adding to card front using d/s tape and trimming edges flush with card. 


To create extra interest with a raised effect I added 3D foam pads to the back of each circle.

Position circles onto card front panel with butterflies in different positions and circles overlapping slightly, when happy with positioning remove backing from foam pads and press into place. I found it easier to stick down the first circle and the last one before adding the others. 

I’ve tried to keep this card CAS (clean & simple) with lots of white space and confining the colour to circles, it can easily be adapted using other stamps such as flowers in place of the butterflies or by using some of the other sentiments in the stamp set. 

Angela
Products used:
Colour Chemistry Triple Inkpads (fruity reds, sunshine yellows, meadow greens, sky blues, berry purples)

Also, Plain White Card, black card, & White Linen effect card – Papermilldirect
Black memento ink
d/s tape, 3D foam pads


Tuesday, 19 July 2016

Rainbow Swirl by Nick Roberts

Morning, I am so pleased to be sharing another project as a guest designer for Lynnda at Oak House Studios. I adore Roses, so I just had to use the Dog Rose for me Project today, these were seen on Hochanda during Lynnda's last visit. For this 'Rainbow' project I have used the single rose bloom, a beautiful sentiment along with the 'English Garden' background stamp.

I started by stamping a few of the blooms onto copier paper with black Archival. These were then cut out to use as masks.


Having stamped the sentiment onto a 2 3/4'' die cut, I surrounded it with clusters of dog roses, which I built up using my masks.

I cut my main card to 7 3/4'' square and stamped the rose again, firstly randomly across my card and then in clusters around the edge, again using the masks I made earlier.

I masked off all of the roses both on the card and sentiment using Pebeo Drawing Gum. On the background I stamped the 'English Garden  diagonally across my card using black Archival.

I took my Tornado stencil from Decoart and secured it in place with temporary adhesive. Then  taking a blending sponge I swirled the Pure Colour Chemistry inks through it. I used Bottle Sunshine, Pumpkin and Totally Turquoise.

Using the centre of the same stencil I did the same, this time using only the Bottled Sunshine and Pumpkin.

I cut a mat for both my sentiment and card in 300gsm white card and edged it with Black Nuvo Gilding Mousse, although it's black it does give a much softer look while still accentuating the design. Finally I mounted my design and added the sentiment using 2 layers of foam tape to raise it from the card.


And here is the finished card.


Thank you so much for taking the time to look at my post, I really hope you have enjoyed the step by step and the card I am sharing with you today. Take care and see you soon. xx

Sunday, 17 July 2016

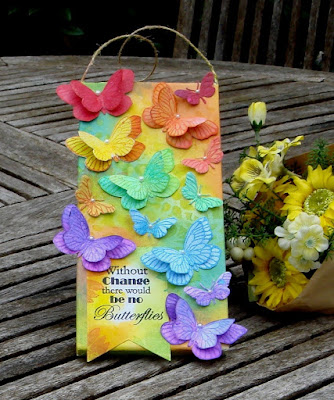
Take 5 - Rainbow Butterflies


Sylvia here with another Take 5 rainbow colours post from me today.  I have been inspired recently by the beautiful colourful creations I have seen around using masses of different sized butterflies to make a swathe of colour.  This is my take on this theme using two Oak House Studio butterflies and a small die cut butterfly with pure colour chemistry inks and pigment ink pads and a wall paque.

http://designsforoccasions.blogspot.co.uk/

I coloured a piece of paper with bright coloured pigment inks using an ink blender and added a little stencilling for interest.  This was glued onto a wall plaque to make the base for my butterflies.  Using pure colour chemistry inks I sprayed seven pieces of card with bright rainbow colours ready for stamping.  Two sizes of the Charming Butterfly stamp were used to stamp butterflies onto  each of the inked cards using co-ordinating pigment inks.

The butterflies were fussy cut and one large and one smaller layered together.  I die cut a smaller butterfly from each of the colours and over stamped them with the butterfly stamp.  


A die cut banner was coloured with pigment inks and stamped with the Without Change sentiment.  I added the sentiment to the bottom of the plaque and placed the butterflies  round it and up to the top of the plaque in the rainbow colours.

I only used two Oak House Studio butterfly stamps but the new butterfly bundle stamp set has a variety of butterflies and the sentiment you could use to give more variety.

Don't forget to join us in this month's challenge, post your projects on your blog or facebook and let us know where to find it and we will pop over and take a look.

Friday, 15 July 2016

Enjoying the possibilities with Oak House Studio


Hello, its Angela here to share a project created with Oak House Studio products.  I’ve been thinking about Lynnda’s recent post, about her stamps being not just images, but being possibilities.  I looked at the stamps and realised that they are indeed possibilities, possibilities to be creative however you wish.  

So with this newly realised freedom the Dress Form stamp evolved into an imaginative and colourful dress, with butterfly sleeves and a daisy vellum ruffle hem, using lots of different colours for this week’s theme of ‘rainbows’. 
I started by painting a 5” x 7” canvas with Gesso to prime it before applying Colour Chemistry inks in Citrus Lemon, Jubilee Blue and Pumpkin.  Stamping circles and triangles with the Triple Sky Blues inkpad and adding extra highlights by stamping with white acrylic paint and using a baby wipe to blend and distress in places.  


The dress Form and butterfly were stamped in Versamark onto hammered card and then heat embossed using the OHS Gold detail embossing powder.  I used a paintbrush to water colour the dress form using Paris Pink and French Lavender Colour Chemistry inks, with Peacock Green and French Lavender for the butterfly.  I also stamped small circle details to the dress form using Triple Sky Blues inkpad and used a white gel pen to add dots and highlights.
For the ruffle skirt I stamped one of the large Double Daisy stamps onto plain white vellum and heat embossed with the gold detail powder, using a paintbrush to watercolour the petals with orange colour chemistry.  Dress was assembled with glue by cutting butterfly in half and attaching each wing to each shoulder of body form, and the daisy vellum was cut out and added to bottom to create a ruffle skirt.   I shaped the completed dress in my fingers, added a pale pink organza ribbon and heart shaped pin before adding some foam pads behind the body to shape it before attaching to the canvas with glue.


The ‘Creativity Never Goes Out of Style’ sentiment stamp was stamped onto hammered card, that I’d previously water coloured and over stamped. I  heat embossed with gold and cut it into 3 parts. Inked around edges with blue ink from the Triple Sky Blues and then glued into position onto the canvas.

I had so much fun making this project and felt the sentiment was very apt, the Oak House Studio inks and stamps were a joy to use as always, and I even discovered a new favourite embossing powder along the way.  Lots of future possibilities indeed.


Angela